If you follow me on Facebook or Instagram then you’ve likely seen the post teasing my DIY Portable Horse Panels project. I had a lot of people ask me to share the details on how I made my panels, so that’s exactly what I’m doing today. 🙂
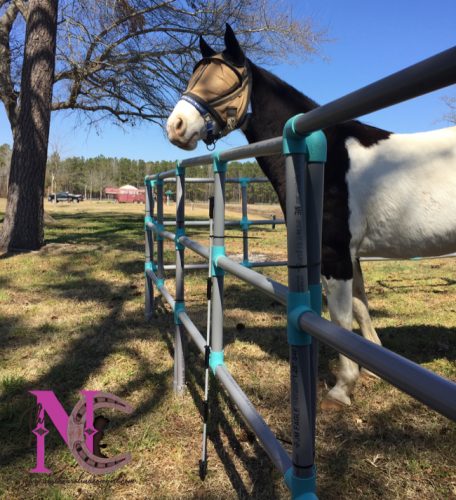
First though, let me explain why I made my own horse panels versus buying some already made. There are actually a couple of reasons:
- I thought I could make them cheaper then the ones I’ve seen marketed by other companies.
- I wanted a special color no one had.
- I did a lot of research and was worried the set I could buy wasn’t constructed well enough that my horse wouldn’t get her head caught in it.
I’m glad I did end up making my own because a friend of mine did buy a set online and while we were camping her horse did get her head through the rails and did pop that panel loose. I took video of that too and you can see it below.
Materials Needed for DIY Horse Panels
3 cans of Valspar Spray Paint (I used Nautical but you choose the color and finish you like)
25 Long Zip Ties
6 – 8 Step in Posts (or you could use 3ft t-posts)
Step by Step Instructions for Building the Horse Panels
Before you begin you will need a Miter Saw to cut the conduit down to the correct sizes. I would also recommend you go ahead a day before hand and spray paint all of the Tees, Elbows and Crosses so they can dry. You’ll want to spray multiple them at least 2 times.
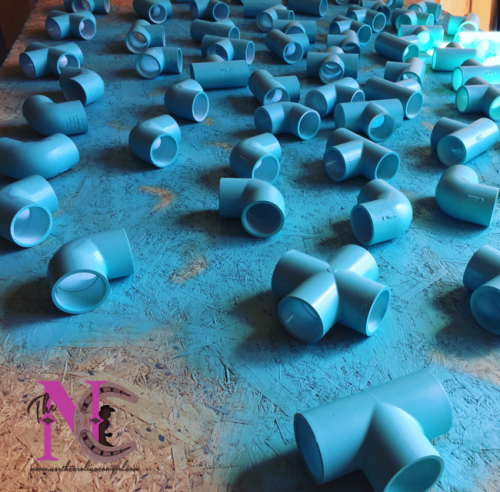
To Make One horse panel you need to:
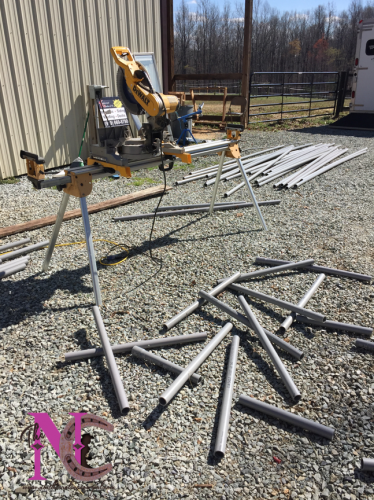
Step 1 – Cut the conduit into 6 pieces that are 30″ each. 6 pieces that are 16″ each. 2 pieces cut 13″. These 2 pieces should be 13″ from the end of the conduit pipe because you will use the wider end as the bottom of the panel. The wider bottom is shown as red in the drawing.
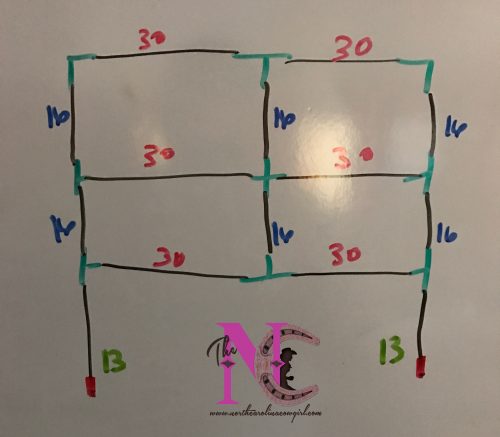
Step 2 – Lay the pieces out on the ground how they will all go together. Use these pictures as your reference point.
Step 3 – Start with the bottom rail and then work your way through each piece until the panel is complete. Before you put all the pieces together, make sure you put glue around the inside each of the connector pieces (i.e. Tees, Elbows, Cross). When putting each piece together make sure you push the conduit and connectors all the way together so the conduit is as far inside each connecting piece as it can go.
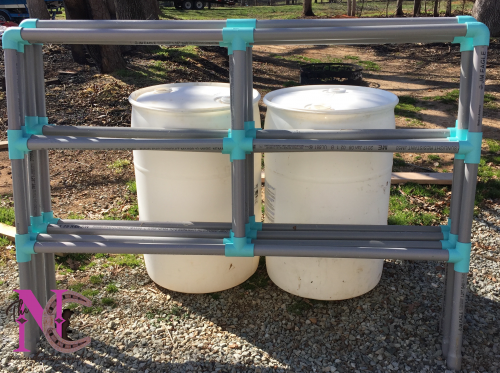
You’ll continue to repeat this process for each panel you make. The material list above will make 8 horse panels that are around 5 foot in length each. If your unsure how to do something, please leave a comment below. I’ll answer all questions there so that anyone else who might have the same question can see it.
How to Set up the DIY Panels
Now for the fun part! The set up is actually pretty easy.
I used my trailer as one of the walls but you don’t have to do that. I did it so the box area for my horse was larger.
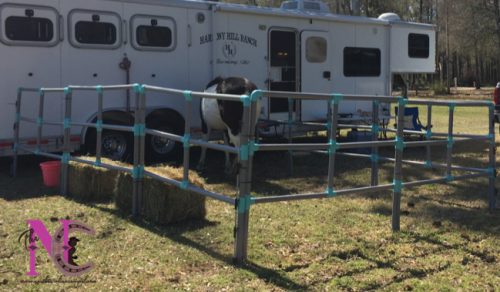
First you will need to drive a step post into the ground where you want your first panel to be set up. Once it’s in the ground, position one end of the panel beside it so you can zip tie the end to the post. The post is use to keep the panels sturdy. Next, grab your send panel and position it inline with the first and then zip tie the two ends together. If you are not using your trailer as a side, then at the end of the second panel (i.e. corner of the box) place another step in post and zip tie it to the panel end. Now repeat this process until your have all 4 sides complete and then you’re done! If you are setting up all 4 sides, make sure you don’t connect one of the corners so you are able to put your horse in and out of the box area.
That’s it! Not to complicated or hard! If you make these and use them, I’d love to hear from you and what you think of them in the comments below! 🙂

78 Comments
Anissa Anderson
March 26, 2017 at 7:19 pmCost wise, did they come out less expensive than buying ready made?
Thanks
NC Cowgirl
March 26, 2017 at 7:55 pmYes less costs and the only thing you have to do different from ordering the kit, is cut your own pipes. Otherwise, the kit you can buy online does not come put together. So you’re just buying the materials for them and paying more.
beej
October 16, 2018 at 10:20 pmActually the kit has furniture grade PVC tees and ells so you don’t have to paint them. If you paint them you have constant maintenance because they chip over time and that sucks!
sarah
March 27, 2017 at 10:08 amLooks awesome! I do wonder if my horses would respect it. I suspect my mare would (unless something looked extra tasty) but my gelding may think it is a toy. 😉 I’d probably practice containing him while he’s still in a pasture at home first. I’m tempted to try this though! How much do you think it ended up costing you?
NC Cowgirl
March 27, 2017 at 10:18 amHey Sarah, if you think you’re horse wouldn’t respect it, I definitely recommend trying it at home. Rumor never tested it but she’s the type of horse that wouldn’t. The total cost was around $216.
Trina
July 16, 2019 at 3:02 pmyou could put a line of electric tape with a solar charger.
Sheri Simms
April 1, 2017 at 12:21 pmI have been thinking about ordering more one, but thought I can build this myself. Then I saw your plans on FB. Will fallow your plans and let you know. Thank you
Sarah
June 6, 2017 at 10:32 amThe supplies aren’t adding up for me. Should be 48 tees, 16 elbows and 20 sticks of conduit for 8 panels!?
NC Cowgirl
June 6, 2017 at 11:46 amHi Sarah – You shouldn’t need 20 sticks of conduit if you cut it right. You will need 48 Tees and 16 elbows. I’ve updated the post to make it accurate for 8 panels. Thanks for catching that!
Candace Gunder
February 10, 2018 at 1:25 pmWhat inch round piping did you use…did you use 1- 1/4 inch conduit pipe-10 ft long..?
NC Cowgirl
March 8, 2018 at 8:14 amYep. 🙂
melanie
June 29, 2017 at 12:04 amhow long of conduit do I buy
NC Cowgirl
July 13, 2017 at 8:56 amHi Melanie – I believe the pieces we bought were 11 or 12 ft long.
M. Christain
June 19, 2018 at 10:55 amWhen I built eight panels it took twenty one pieces of conduit pipe. After all of the panels were built I had a 6′ section of conduit left over.
Amy
August 20, 2018 at 12:35 pmSame for me. It took 21 pieces of conduit. I just made these this weekend.
39 Camping Essentials for You and Your Horse | Horse Camping Checklist
September 24, 2017 at 9:16 am[…] Panels – now depending on where you camp you might or might not be able to use these. But I keep them packed in my trailer for every trip. (BTW, if you don’t have any, check out my DIY Build Your Own Panels Post) […]
Chaselyn Ladd
November 6, 2017 at 9:52 pmWhat do you think about making these taller to use for a round pen? Looking for more affordable options to expand mine. I think in theory, making these taller and tying them to some t-posts might help me do that without spending hundreds of dollars.
NC Cowgirl
November 8, 2017 at 2:12 pmHi Chaselyn – I would be a little worried to use these as round pen panels. They aren’t very sturdy even with the t-posts. They are great for small spaces where your horse isn’t running around and won’t push on them, but for lounging in a round pen, I wouldn’t recommend them.
Michael b. wisenbaker
November 21, 2017 at 8:24 pmQuestion
I’m trying to make mine or was out of metal 10′ instead of 5′ only cause my Horse Trailer will only be able to carry 7 panels an I was setting mine up so the horses could go back into the trailer for HAY and water troff and graze where I park at. Do you think 10 ft would be to much and I was gonna drive 3/4 ” Todd’s in the ground to slide panels on before attaching to the Trailer. Also at 5′ go to the ground for support. What do you think? Metal is heavy I like this design. Great work. If you have doubts I can still make it out of metal. Colour of metal good idea too
NC Cowgirl
November 27, 2017 at 8:47 amHey Michael – The metal will likely work, the only thing that comes to mind is that, it will be super heavy to carry in and out of your trailer. Assuming you pack it inside like I have. The plastic pipes that we used are still actually quite heavy when you carry more then one panel at a time. If the heaviness isn’t something that bothers you, then metal would likely work as long as you definitely have some way to keep them sturdy.
Ann Lindstrom
January 4, 2018 at 8:27 pmI’m thinking of making panels like yours but larger..say 4.5 feet tall and 6 feet wide. Do you think they would still be solid and sturdy ?
NC Cowgirl
January 16, 2018 at 11:57 amThey probably would be. If you have a slant trailer like I do, you won’t be able to fit them in it with them that wide…unless it doesn’t have managers. Then you might be ok.
Ann
January 11, 2018 at 11:00 amHow tall and wide are your panels?
NC Cowgirl
January 16, 2018 at 11:56 amHey Ann, The panels are 4ft Tall and 5.5 Ft wide.
Leslie
February 4, 2018 at 9:43 pmHey…. so how much material would I need for my 26 inch high mini horse?
Thanks!
NC Cowgirl
February 7, 2018 at 8:30 amI’m honestly not sure. If you aren’t making the panels as tall, you probably wouldn’t need as many pipes.
Chelsea McMurdo
February 25, 2018 at 9:05 pmProbably just plan on the middle rung being the top instead. So 2 rungs. This is a ball park…take away 60ft of conduit and also subtract the fittings from what would have been the middle.
Teresa
February 26, 2018 at 12:59 pmI could only find 10′ poles. So by my calculations: total of 2416″ needed for 8 panels…I need 21 poles without having to piece together extra pieces. Although I cannot find them where I am…for 11′ poles, one would need 19…and for 12′ poles, one would need 17 (again, that would be without piecing anything together). I have figured and refigured, please let me know if I am figuring incorrectly. I’m excited to start but want to make sure I have enough supplies before starting.
NC Cowgirl
March 8, 2018 at 8:13 amYour calculations sound right to me. 🙂
Frank Plummer
March 8, 2018 at 8:09 amI had a friend that made a round pen like this but he added rebar and poured them full of concrete . He was tired of rusting panels . Last time I spoke to him a few years ago it was still in use and there was no rust . lol
NC Cowgirl
March 8, 2018 at 8:13 amThat’s awesome! What a great idea!
Stacey Gaunce
April 15, 2018 at 10:54 amI am looking for a round pen idea. Concrete poles sound great…just curious if u could use tposts instead of concrete, but larger diameter conduit to fit over them.
NC Cowgirl
April 19, 2018 at 7:53 amHi Stacey,
I didn’t use concrete with mine. I used the posts that you could put in the ground with your foot. I felt t-posts would be too much trouble for traveling. But if you plan to leave this up permanently, then I think that would work or at least be worth trying.
Tracy Jensen
April 22, 2018 at 1:32 pmHave you ever tried filling them with water after set up? I though it might make them heavier and there for a bit more sturdy.
NC Cowgirl
May 3, 2018 at 6:44 pmI haven’t but I feel like that might be more of a pain to undo them then it would be worth. I actually plan to clue all the pieces together b/c I’ve had an issue with them coming apart to easily lately.
Kathleen
November 19, 2018 at 5:35 pmPlease explain “coming apart”. I was very excited to see these plans and was going to keep the finished panels in my show trailer…..but I don’t want escapees! Thanks
NC Cowgirl
November 21, 2018 at 6:30 pmHey Kathleen – Because I opted not to glue all the pieces together when I first made the panels, when I lift them up to move them in and out of the trailer, a piece or two would come apart. Nothing horrible or bad. It was just a pain in the butt bc I would have to push them back together and move it more carefully. So now I’ve glued all the pieces together so they won’t come apart.
Sue
May 8, 2018 at 3:22 pmThank you for the great instructions! I’m going to try this next. What do the “step in poles” look like and where did you buy them?
NC Cowgirl
May 10, 2018 at 9:36 amHi Sue! I got the step in posts from Tractor Supply. They have plastic ones that cost about $2 each. 🙂
Casey
May 9, 2018 at 5:56 pmConduit versus PVC? Opinions?
NC Cowgirl
May 10, 2018 at 9:38 amHey Casey! I went with Conduit bc I wanted the grey color. I’m not sure if there is a difference in sturdiness between them though. I don’t know enough about each material to be able to say. :/ Sorry!
Leo hauser
December 25, 2023 at 9:13 pmWhat you were using is schedule 40 if you want it heavier use schedule 80 the wall of the pipe is thicker and instead of Lowe’s or Home Depot go to electric supply shop plus you can buy longer pieces from them 21 ft long I think it comes in
M. Christian
June 19, 2018 at 10:59 amGo with the Conduit, it has a heaver side wall (schedule 40), the 1-1/4″ PVC is half the thickness of conduit.
Tammy Poncia
May 23, 2018 at 8:22 pmWhat does each panel weight ?
NC Cowgirl
June 6, 2018 at 8:15 amI’m really not sure Tammy. They aren’t heavy though. I can carry two together easily.
Wendy
June 16, 2018 at 6:40 amHow hard would it be to run a hotwire threw?
NC Cowgirl
June 19, 2018 at 11:43 amI’m really not sure.
Mary
September 28, 2018 at 1:39 pmI bet not too hard to run a hot wire through. Just drill a hole and run through, power with a solar charger.
Betty Jo Motes
June 28, 2018 at 10:13 pmWhat would be the size of the small space? like 10’x 10′?
NC Cowgirl
July 7, 2018 at 10:39 amYep, that is the size.
Don
July 7, 2018 at 10:04 amMy first question was similar to Casey’s about why electrical conduit and then pipe fittings. The electrical is cheaper than plumbing PVC so if it is strong too, that’s great. My second question is about using “furniture” PVC instead of plumbing PVC. My thought is that instead of using plastic ties, I would use tees instead of elbows at the top of the edges and crosses instead of tee for the middle and lower bar. I would then glue a short piece of pipe into the “middle panel” in all 6 locations. These pipes would then fit into the “end panels” connectors. I would use cotter pins to attach the panels together (hole drilled through the pipe and connector.) At the corners of the set of 3 panels, I would need 3-way and 4-way connector, which I can only find in furniture PVC. I’m concerned about the strength, but I guess if the horse is going through the horse will go through. Yes it’s more complicated and I’ll probably need to number each panel, but I hate leaving a trail of twist ties across the country.
NC Cowgirl
July 7, 2018 at 10:39 amHey Don! My horses haven’t had a problem being in these panels and don’t test the integrity of the set up (knock on wood). I wanted to make the panels as cheap as possible so I could save money from buying a set built buy a company that charged twice as much. I also wanted it to stay as light as possible bc my trailer already weights so much. I would imagine there are many different ways to make these and improve upon this design though and would totally encourage you to try. 🙂
Thanks for reading my post and providing some great feedback! Happy Trails! ~Ashley
Sam
July 22, 2018 at 3:08 pmThis is a fantastic idea! I will be making a set they will be 8ftx42in. If they dont respect it then I will string a solar electric fence with it they sure know what that is. I will definitely let you know how it goes when we get back from Yellowstone. Thanks
Kiana
August 7, 2018 at 7:43 pmHow did you get the panels to attach to your trailer?
NC Cowgirl
August 7, 2018 at 8:26 pmHi Kiana – I didn’t attach them to my trailer. I carry them inside my first horse stall. 🙂
Laurie
August 23, 2018 at 4:56 pmOn our stock trailers we weld hooks on the outside that are made to carry portable panels
NC Cowgirl
September 7, 2018 at 8:12 amI’ve got that same hook up on my stock trailer too! Sadly I don’t camp with that trailer so they are never used.
Terri Hutto
August 23, 2018 at 10:04 amLove this idea. Am going to make them. I’m thinking glow in the dark paint for the connectors, just to make it easier for me to see the horses are “in” at night. Thanks so much for the directions! This is fabulous. Can’t wait to put these together!
Jeremy
September 17, 2018 at 7:46 pmWhat are you using for a gate to go in and out
NC Cowgirl
September 18, 2018 at 7:36 amHey Jeremy – I use one of the panels as the gate.One of the gates at the trailer, I use to go in and out of. I just pull up the stake every time I need to open the panel and then I push it back in when I close it. It’s a pain in the butt, so I’m sure there’s a better way to do it, maybe leaving the stake and using my lead rope to tie the panel it too it. That way it stays in place and only the panel moves….might try that next time. ~Ashley
Donna
October 1, 2018 at 10:08 amCould you put it up at the back edge of the trailer then use one of the trailer gates as part of one wall. Swing it all the way out and tie to pvc and it could open and close at will. Just a thought.
Chris Hetrick
September 25, 2018 at 11:57 pmI don’t own a saw like that, I have a sawsall, a skil saw, a table saw….would one of those work on the pipe?
Chris Hetrick
September 25, 2018 at 11:59 pmDoes anyone know what other kind of saw could be used to cute pipe, I don’t have one of those. I have a skil saw, table saw, sawsall, etc; but no mitre.
Chelsea
October 4, 2018 at 2:30 amWhen traveling with these pannels.where do you store them? Do they take up a lot of room?
NC Cowgirl
October 17, 2018 at 11:21 amHi Chelsea, I store them in the first stall of my trailer. They take up the entire space but I’m able to put stuff around them.
Chelsea McMurdo
January 12, 2019 at 7:26 pmHow are these holding up? I must say in the video, your panels look much nicer than the manufactured ones. I’m thinking of building some of these, but with 4 bars so they’ll be 5 ft tall like a real panel.
Did you use regular fittings from the hardware store or are they furniture grade?
NC Cowgirl
February 20, 2019 at 1:10 pmHey Chelsea! It’s worked out great. I bought everything I used from Lowes Hardware.
Candice Kratzer
September 14, 2022 at 6:13 pmWhat is the cost of this project. It’s working out to over $1000 when I add it all up on Lowes
NC Cowgirl
October 3, 2022 at 1:30 pmHi Candice – I’m not sure what the cost would be today. I’m sure it’s changed since I built this years ago. At the time, my goal was to build my own since that was cheaper than buying them from a company. That might still be the case today or it might not but I can say it sure was fun building these and painting them the colors I wanted. They still are holding up strong today and the paint even looks good still.
AL2AK
March 14, 2019 at 10:19 pmDo you think filling these with sand would be a good idea, to make them a little more sturdy?
NC Cowgirl
October 25, 2019 at 7:39 pmPossibly but they would definitely be heavy to move then. :/
Debbie
May 12, 2019 at 1:23 amThank you for sharing your plans. I never thought about building my own. The 5.5 foot panels would be much easier to manage at my age and actually stronger with all the joints. If the horse brakes the ties and gets out he has less hardware to get injured by. Saw a horse move steel panels 18″ when a bear came, and unfortunately broke her neck on the panel that wouldn’t give. You are awesome for sharing!
NC Cowgirl
October 25, 2019 at 7:36 pmOh my, that’s awful!!
Deb
May 12, 2019 at 1:37 amThank you for sharing! The smaller panels are actually stronger with all the joints and easier to manage! Break away is good… I know of a poor horse in 20×20 steel pipe that moved it all 18″ trying to get away from a bear. She broke her neck… It changed my thinking.
Ryan J Kelly
August 17, 2019 at 1:07 amI’m seriously considering building these panels to use at home and drilling holes for polywire and using a solar fence charger you’re giving me great ideas also you should check out circo innovations . com they have a lot of pvc plans and 1 for a corral that I’m going to combine your idea and theirs to build a gate
joan b carter
August 29, 2019 at 6:55 pmGreat idea! Just cut and painted mine but took way more than 3 cans of spray paint. Once the paint cures, I’m going to put a clear acrylic over them, connect them then one more clear coat.
Kayla S
January 9, 2020 at 2:31 amHey Ashley
I’ve been sent a link to your awesome post about the panels you’ve made and I’m really impressed. I’d love to do the same thing but I’m not sure what to get as I’m located in Australia. But I’m keen as beans to try!!
Debra A Duvall
July 24, 2021 at 8:43 pmHow long does the PVC last? My husband want to build them out of conduit instead for durability but I’m worried about weight.
Thanks.